Service Workers: Save your User's Data using the Save-Data Header | Dean Hume
Save article ToRead Archive Delete · Log in Log out
6 min read · View original · deanhume.com
I was recently travelling abroad when I urgently needed to get some information from the website of my airline. I was on a sketchy 2G connection that took forever to load the page, and eventually I ended up giving up completely. I was also paying a fortune for this daily service from my mobile provider back home! If you've ever been desperate to get some information from a website and have a dodgy mobile connection, you'll know how frustrating it can be.
Throughout the world, 4G network coverage is rapidly accelerating, but we still have a long way to go. 3G networks were only launched in late 2007 in countries such as Bangladesh, Brazil, China, India, Nigeria, Pakistan and Russia — where almost 50% of the global population is located. While mobile coverage is growing, it's crazy to think that a 500MB data plan can cost around 17 hours worth of minimum wage work in India.
Fortunately, browser vendors such as Google Chrome, Opera and Yandex have realised the pain that many users face. With the latest versions of these browsers (including Chrome 49), users will have an option that allows them to "opt-in" to a feature that will save them data. By enabling this feature, the browser will add a new header to each HTTP request. As developers, it's our chance to look out for this header and return the appropriate content in order to save our users data. For example, if a user has opted-in to save data, you could return lighter images, smaller videos or even different markup. It's a simple concept, but very effective!
In this article, I am going to show you how to enable the Save-Data feature in Google Chrome, and how you can detect and return a "light" version of your web application using Service Workers.
Enabling the Save-Data Feature
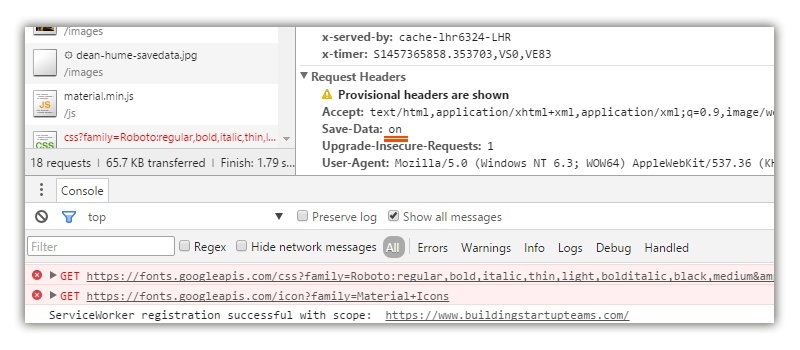
Whether you are on a desktop or mobile device, enabling this feature is a relatively straightforward process. As a desktop user, you can enable this feature using the Data-Saver Extension in Google Chrome. If you are on a mobile device, you can enable this under Settings -> Bandwidth -> Data Saver. Once the setting is enabled, each HTTP request to the server will include the Save-Data header. If you view this using your developer tools, it might look a little something like the image below.
Now that you've enabled the Save-Data header, we can detect and return the appropriate content.
Detecting the Save-Data Header
Once the Save-Data feature has been enabled, there are a few different routes that you can choose to return data to the user. Because each HTTP request will go to the server, you could decide to serve different content based on the the Save-Data header directly from server-side code. If you preferred to do this on the network level, you could even determine the best content to serve by using your load balancer to detect the Save-Data header. If you are using PageSpeed for Apache or Nginx to optimize your pages you can automatically enable data savings for your users.
However, with just a few lines of JavaScript and using the power of Service Workers, you could easily intercept the HTTP requests and serve lighter content accordingly. As a web developer with no access to the server configuration, this is a perfect option. If you aren't familiar with Service Workers, I thoroughly recommend checking out this Github repo for more information. I've also previously blogged about Service Workers on this site!
Service Workers allow you to intercept outgoing HTTP requests, inspect them and act on this information. Using the Fetch API, you can easily implement a solution to detect the Save-Data header and serve lighter content.
Let's get started by creating a JavaScript file called service-worker.js and adding the code below to it.
| "use strict"; | |
| this.addEventListener('fetch', event => { | |
| // Save Data support | |
| if(event.request.headers.get('save-data')){ | |
| //Return smaller images | |
| if (/\.jpg$|.gif$|.png$/.test(event.request.url)) { | |
| let saveDataUrl = event.request.url.substr(0, event.request.url.lastIndexOf(".")) + '-savedata' + event.request.url.substr(event.request.url.lastIndexOf("."), event.request.url.length - 1); | |
| event.respondWith( | |
| fetch(saveDataUrl, { | |
| mode: 'no-cors' | |
| }) | |
| ); | |
| } | |
| // We want to save data, so restrict icons and fonts too | |
| if (event.request.url.includes('fonts.googleapis.com')) { | |
| // return nothing | |
| event.respondWith(new Response('', {status: 408, statusText: 'Ignore fonts to save data.' })); | |
| } | |
| } | |
| }); |
Let's analyse the code above and break it down step-by-step.
In the first few lines, I am adding an event listener to listen out for any fetch events that take place. For each request that takes place, I am checking to see if the Save-Data header has been enabled.
If the header has been enabled, I then check to see if the current HTTP request is for a image of type JPEG, GIF or PNG. If I know that the current HTTP request is for an image, I can then determine the best content to return based on the HTTP headers that are passed through. If the current request is for an image, I am then appending "-savedata" onto the name of the file. For example, if the file name was "hero-image.png", it will now become "hero-image-savedata.png". I then keep a copy of a really low resolution image on the server and it gets returned in the HTTP response.
I am currently using this code on the buildingstartupteams.com site and returning low quality images back to the user.

Eeew....the images don't look great! Okay fair enough, but remember that we want to get content back to the user in the lightest possible way. Using this technique, the user will have saved 975 KB in images which is a huge saving! You can tweak the content you return however you feel because using this Save-Data header puts the control in your hands.
Let's take this even further. If your website is using Web Fonts and the user has enabled the Save-Data feature, you might want to ignore any HTTP requests for Web Fonts. In the code above (around line 20), I am checking if the current HTTP request is for fonts from Google and then returning an empty HTTP 408 response.
Before you start using this code, you will want register the Service Worker in your HTML. The code below references the service-worker.js file that we created earlier.
| <script> | |
| // Register the service worker | |
| if ('serviceWorker' in navigator) { | |
| navigator.serviceWorker.register('/service-worker.js').then(function(registration) { | |
| // Registration was successful | |
| console.log('ServiceWorker registration successful with scope: ', registration.scope); | |
| }).catch(function(err) { | |
| // registration failed :( | |
| console.log('ServiceWorker registration failed: ', err); | |
| }); | |
| } | |
| </script> |
That's it! Using the example above, you can detect if a user has opted-in to save data and return the appropriate content. The power is in your hands!
Summary
The Save-Data header is a brilliant feature that opens a lot of possibilities for us as developers. In this article, I ran through an example that uses Service Workers which does unfortunately mean that it will be limited to newer browsers, but it is an easy way to start providing your users with lightweight content and little fuss.
As web developers, we are ultimately responsible for the experience that our users receive when visiting our sites - this includes the cost of loading and downloading all resources!
Further Reading
If you'd like to find out more about the Save-Data header, I recommend checking out this article entitled Delivering Fast and Light Applications with Save-Data by Ilya Grigorik. Happy experimenting!
Comments
hotjs - 3/12/2016
hotJS - a new website that will give you the latest and best resources on the web
https://www.hotjs.net/
Add your comment