Automatically Build your Unity3D Project in the Cloud using TravisCI for free
Save article ToRead Archive Delete · Log in Log out
9 min read · View original · jonathan.porta.codes
This post is meant to help you get started with a simple automated CI pipeline, using Travis-CI for Unity3D projects.
Unity3D’s ability to cross-compile your game for tons of platforms is pretty badass. It solves the multi-platform problem well. But, it still leaves a lot up to the developer, like, actually making the game (duh!) and getting the finished game builds to the player. Often developers use some sort of distribution service/platform/store to get their game to the player. But, there are some steps missing. How do I generate builds for testing every single time there is a code change? How does the final product make it to the distribution service?
Cool. Why?
Whenever I find myself doing something over and over and over again I usually get bored. I am kind of an impatient guy when it comes to software and the process of developing software. I don’t like having to manually setup, transpile, package, and upload my Unity3D builds. The majority of projects that I work on have a continuous integration pipeline, and this is something I have really missed in my Unity3D projects.
Some Dependencies - Do this first!
If you want to implement your own version of that I am about to describe you are going to need a few development tools available on your machine and you’re going to need free accounts for several online services.
Development Tools Needed:
- Unity3D 5.0 Personal Edition (at least)
- git
- to test locally you’ll need an environment that allows you to execute bash scripts - If you’re using OS X then you are good to go. If you are using Windows you will need something like ConEmu and gitBash. You can get away without these, but it will be more difficult since you won’t be able to test your work locally. You’ll have to push each little change to your GitHub repository and rely on CircleCI’s output to debug. The script examples I am providing are all specific to OS X and would need to be modified to support running them on Windows.
Accounts:
- Github.com - This is one of the most popular online code hosting services, and my favorite. They have definitely earned their popularity by building a great service that helps developers do their job. Plus, it’s free if your repository is open to the public, and super cheap if you want to have private repositories. There are other places to host a git repository, but for this guide I am only going to cover GitHub.com.
- Travis-CI.org - Travis is a continuous integration service that is super flexible. I’ve used it to build tons of different project types, run thousands of tests, and even check the status of the Linux Rust multiplayer server. Use your GitHub account to signin and create an account. Travis will need to be able to see your GitHub repositories, so it’s easiest to just signup with your GitHub account. I am using Travis-CI because it is free for public projects, and they offer OS X build environments. Since the Unity3D editor doesn’t run on Linux (Please add Linux editor support, Unity!) we need to use an OS that Unity supports. Travis doesn’t have Windows build environments, so OS X it is! Plus, it’s easier to run a bash script out-of-the-box on OS X than it is on Windows.
Overview
- Create a Unity3D project, set the project settings to be compatible with git, set the default scene for builds, and finally commit and push your sample project.
- Whip up some scripts that handle building your project.
- Install the TravisCI gem and create a
travis.ymlfile to use the build scripts we wrote in the previous step. - Setup S3 Bucket Upload and/or GitHub tagged releases.
Step 1: Create a Unity3D Project Compatible with Git
First, create a Unity3D project as normal. Once the project is created, create and save at least one scene file. There doesn’t need to be anything in the scene file. For my example, I just created the scene and save it with no changes to the defaults.
Second, in order for your project to work correctly with git, you need to make some changes to the project config. Instead copy-pasting those settings here, take a look at this great answer on StackOverflow. Don’t forget to setup the .gitignore file.
Third, commit your initial project files and push to the GitHub repo that you setup for your project.
Step 2: Write the Build Scripts
In order to have our project built automatically, we need some scripts to drive that process. I am using two scripts total. One script will download and install the Unity3D editor. The second script will do the actual work of building the project.
Unity3D Install Script
Since Unity3D isn’t installed in the Travis-CI environment we have to handle that ourselves.
- In the root of your repository create a directory named
Scripts. This is where we will put all of the shell scripts used in CI. - Create a file named
install.shin theScriptsdirectory.#! /bin/sh # Example install script for Unity3D project. See the entire example: https://github.com/JonathanPorta/ci-build # This link changes from time to time. I haven't found a reliable hosted installer package for doing regular # installs like this. You will probably need to grab a current link from: http://unity3d.com/get-unity/download/archive echo 'Downloading from http://netstorage.unity3d.com/unity/3757309da7e7/MacEditorInstaller/Unity-5.2.2f1.pkg: ' curl -o Unity.pkg http://netstorage.unity3d.com/unity/3757309da7e7/MacEditorInstaller/Unity-5.2.2f1.pkg echo 'Installing Unity.pkg' sudo installer -dumplog -package Unity.pkg -target /
This script could be more robust by retrying the download if it fails the first time. But, I haven’t had that happen yet, so, I haven’t had to come up with anything better. ;)
Project Build Script
Now that we have Unity3D installed, we can actually build our project. This script will build your project for three different platforms: Windows, Linux and OS X. If you want to support other platforms, just copy, paste, and change one of the examples. However, some platforms, such as iOS and Android require quit a few other dependencies. While I have gone to the trouble of getting an iOS project building in CI on Travis, I am not going to go into details in this post. If you are super interested in doing that, you can see how I did it on another project. (It was a pain in the ass. I had a lot of issues with Travis’ version of Xcode. Uhg.)
- In the
Scriptsfolder, add another file namedbuild.sh.#! /bin/sh # Example build script for Unity3D project. See the entire example: https://github.com/JonathanPorta/ci-build # Change this the name of your project. This will be the name of the final executables as well. project="ci-build" echo "Attempting to build $project for Windows" /Applications/Unity/Unity.app/Contents/MacOS/Unity \ -batchmode \ -nographics \ -silent-crashes \ -logFile $(pwd)/unity.log \ -projectPath $(pwd) \ -buildWindowsPlayer "$(pwd)/Build/windows/$project.exe" \ -quit echo "Attempting to build $project for OS X" /Applications/Unity/Unity.app/Contents/MacOS/Unity \ -batchmode \ -nographics \ -silent-crashes \ -logFile $(pwd)/unity.log \ -projectPath $(pwd) \ -buildOSXUniversalPlayer "$(pwd)/Build/osx/$project.app" \ -quit echo "Attempting to build $project for Linux" /Applications/Unity/Unity.app/Contents/MacOS/Unity \ -batchmode \ -nographics \ -silent-crashes \ -logFile $(pwd)/unity.log \ -projectPath $(pwd) \ -buildLinuxUniversalPlayer "$(pwd)/Build/linux/$project.exe" \ -quit echo 'Logs from build' cat $(pwd)/unity.log - Change the project variable to better fit your project.
You probably want to take a look at the Unity3D Command Line docs to get a better idea of the options available and how to customize your build parameters to your project.
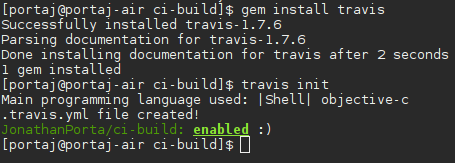
Step 3: Setting up Travis
In order or Travis to know what to do we need to put a file named .travis.yml in the root of our git repository. To make things easy, install the Travis cli gem. After installing the travis gem, just run travis init from the root of your repository. For the language type enter objective-c this will ensure that our build executes on an OS X machine. Once done, commit and push your changes. You should be able to see the build start by logging into your Travis account.
If you want to create the Travis config by hand:
1. Create a file name .travis.yml in the root of your repository.
| # Example Travis config. See the entire example: https://github.com/JonathanPorta/ci-build | |
| language: objective-c | |
| osx_image: xcode61 | |
| rvm: | |
| - 2.1.2 | |
| install: | |
| - ./Scripts/install.sh | |
| script: | |
| - ./Scripts/build.sh |
2. Login to your Travis account and enable Travis for your project’s repository.
3. To make sure your Travis config is correct, you can use the Travis Linter
4. Commit and push your changes. You should be able to see the build start by logging into your Travis account.
Step 4: Put your built assets somewhere
If everything has went as planned, you should now have a project that gets built in Travis automatically everytime you push code to your repository. Yay! Except, we aren’t putting the built files anywhere, so let’s fix that!
I am going to use S3 as the example, but you could put them anywhere. Travis makes it super easy to dump your assets in S3. You will need to first create an S3 bucket and copy your access credentials. We are going to use the travis command line interface to setup the deployment. It will encrypt our S3 credentials to keep them safe from prying eyes.
- Run
travis setup s3from your repository’s root and follow the instructions. Checkout the Travis S3 Deployment docs if you get stuck on this part. - Double check your
.travis.ymlto make sure that your S3 secret key is NOT in plaintext. - Commit and push.
- Check the travis build output to see if anything went wrong. If not, your build files should be sitting in your S3 bucket ready to share with the world, or whoever.
And, that’s it!
That’s all folks!
I haven’t done any automated testing with Unity3D yet, but, when I do I plan to update my CI scripts to run those tests and only deploy if the build is passing the test suite(s).
I hope this post was helpful. Let me know what you think in the comments. Happy building!